SETUP UBUNTU 20.04 SERVER WITH ANSIBLE
If you want a more hands on approach you can follow the following tutorial: https://johannes-pirmann.com/setup-ubuntu-20-04/
Prerequisites
- An Ubuntu 20.04 Server with the LAMP-Stack installed.
- A root user and password
- A domain
- The Ansible Playbook: https://github.com/Pirmann-Media/ansible-playbooks/tree/main/ubuntu-20-04-setup
Step 1 - Get the Playbook
Go to the GitHub Repository and download the ansible playbook.
Step 2 - Adapt the provision.yml file
Go to the provision.yml file and set your desired username and the corresponding password. Additionally, specify the path to your public SSH key and the host which should be used.
Step 3 - Execute the playbook
To execute the ansible playbook run the following command:
ansible-playbook provision.yml --ask-pass
Now you need to enter the root password.
HOW TO INSTALL NGINX ON UBUNTU 20.04
Introduction
In this tutorial I’m going to cover how to install Nginx on an Ubuntu 20.04 server. Additionally I’m going to setup a simple website and create the configuration within Nginx to make the website available.
This article was first published at Hetzner Community: https://community.hetzner.com/tutorials/how-to-install-nginx-on-ubuntu-20-04
Prerequisites
- Setup Ubuntu 20.04
- A top-level domain, e.g. example.com
Step 1 - Login to server
Login to your server with your non-root user:
ssh holu@10.0.0.1
Step 1.1 - Update your server
After a successful login, we need to update our server.
For this we run the following command:
holu@10.0.0.1:~$ sudo apt-get update && sudo apt-get upgrade -y
Step 2 - Install Nginx
We will install Nginx with the help of apt.
For this execute the following command:
holu@10.0.0.1:~$ sudo apt install nginx
Step 3 - Update the firewall
In the previous tutorial we set up a firewall, which blocks all connections except the ones from OpenSSH. Now, to be able to use Nginx we need to allow it within the firewall.
Step 3.1 - List available ufw applications
To know what to activate within ufw we will first list all available applications, which we could enable.
holu@10.0.0.1:~$ sudo ufw app list
This will lead to the following output:
Available applications:
  Nginx Full
  Nginx HTTP
  Nginx HTTPS
  OpenSSH
- Nginx HTTP will only allow HTTP traffic and will open for this port 80.
- Nginx HTTPS will only allow HTTPS traffic and will open for this port 443.
- Nginx Full will allow both HTTP and HTTPS traffic and will open port 80 and 443.
You should only allow the most restrictive option for production. As we are still testing things out and haven’t setup SSL yet, we will choose Nginx HTTP.
Step 3.2 - Adapt the ufw configuration
To tell ufw that it should allow all HTTP traffic we need to run the following command:
holu@10.0.0.1:~$ sudo ufw allow 'Nginx HTTP'
Confirm your changes by running the following command:
holu@10.0.0.1:~$ sudo ufw status
It should output the following:
Status: active
To                         Action      From

OpenSSH                    ALLOW       Anywhere
Nginx HTTP                 ALLOW       Anywhere
OpenSSH (v6)               ALLOW       Anywhere (v6)
Nginx HTTP (v6)            ALLOW       Anywhere (v6)
Step 4 - Check Nginx
Now that the firewall allows HTTP connections to Nginx we can check if everything works correct.
For this we’re going to check the status of **Nginx** with the **systemd** service:
holu@10.0.0.1:~$ systemctl status nginx
And if everything worked out correct, this should be your output:
● nginx.service - A high performance web server and a reverse proxy server
     Loaded: loaded (/lib/systemd/system/nginx.service; enabled; vendor preset: enabled)
     Active: active (running) since Sat 2021-08-21 17:54:37 CEST; 21min ago
       Docs: man:nginx(8)
   Main PID: 6370 (nginx)
      Tasks: 2 (limit: 2280)
     Memory: 4.1M
     CGroup: /system.slice/nginx.service
             ├─6370 nginx: master process /usr/sbin/nginx -g daemon on; master_process on;
             └─6371 nginx: worker process
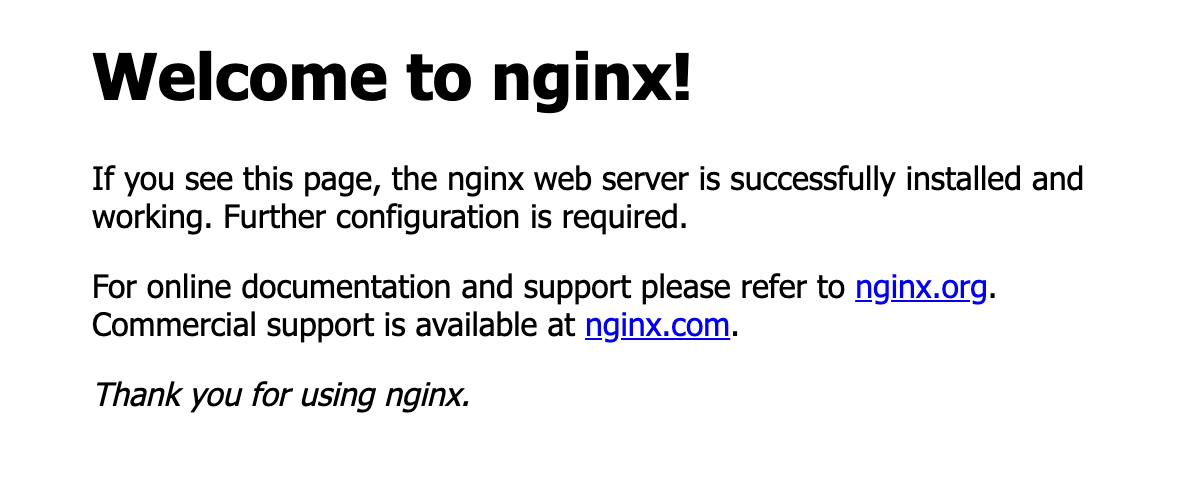
We can also verify the status by navigating to our IP address in the browser:
http://10.0.0.1
You should be greeted by the following message:
Step 5 - Configure a website
Now, we are going to configure a test website and point our domain example.com to it.
Step 5.1 - Create the content directory
The content which will be provided by Nginx can be found here: /var/www/.
Currently there is only the html directory which contains the webpage we just saw.
For our new website we are going to create a new directory.
holu@10.0.0.1:~$ sudo mkdir -p /var/www/example.com/html
Before continuing we need to verify that our new directory has the right permissions. We do this with the following command:
holu@10.0.0.1:~$ sudo chown -R $USER:$USER /var/www/example.com/html
Step 5.2 - Create a sample website
After creating the directory we are going to create a simple index.html:
holu@10.0.0.1:~$ sudo nano /var/www/example.com/html/index.html
Insert the following sample content or create your own message!
<!doctype html>
<html>
  <head>
    <title>This is our test website</title>
  </head>
  <body>
    <p>Hello, holu!</p>
  </body>
</html>
Step 5.3 - Configure Nginx Server Block
Now that we have our website ready we need to create a so called Server Block which tells Nginx where to point requests for our server to.
For this we are creating a new file within the /etc/nginx/sites-available directory:
holu@10.0.0.1:~$ sudo nano /etc/nginx/sites-available/example.com
Add the following basic configuration and adapt it to your directory and domain:
server {
  listen 80;
server_name example.com;
root /var/www/example.com/html;
index index.html;
location / {
try_files $uri $uri/ =404;
}
}
You can find other example configurations here.
Step 5.4 - Activate the Server Block
To enable the Server Block we need to create a link of the file which points at /etc/nginx/sites-enabled/.
holu@10.0.0.1:~$ sudo ln -s /etc/nginx/sites-available/example.com /etc/nginx/sites-enabled/
Step 5.5 - Adjust the server_names_hash_bucket_size
A good explanation for this problem can be found here.
To circumvent it we need to adjust the nginx.conf:
holu@10.0.0.1:~$ sudo nano /etc/nginx/nginx.conf
Find the following line:
# server_names_hash_bucket_size 64;
And uncomment it. It should look like this now:
server_names_hash_bucket_size 64;
Step 5.5 - Test Nginx configuration
Now, that all necessary changes were made we can test our Nginx configuration.
For this execute the following command:
holu@10.0.0.1:~$ sudo nginx -t
If your output looks as following you did everything right!
nginx: the configuration file /etc/nginx/nginx.conf syntax is ok
nginx: configuration file /etc/nginx/nginx.conf test is successful
Step 5.6 - Reload Nginx
After confirming our setup of Nginx we can now reload it and make our changes active.
holu@10.0.0.1:~$ sudo systemctl restart nginx
We can now visit our new website. Browse in your browser to http://example.com and you should see our simple test website.

Conclusion
We were able to install Nginx and configure it to point to our new website.
To add an SSL Certificate to your website follow this article: Add SSL Certificate with Lets Encrypt to Nginx on Ubuntu 20.04
ADD SSL CERTIFICATE WITH LETS ENCRYPT TO NGINX ON UBUNTU 20.04
Introduction
In this tutorial you will learn how to install certbot which communicates with Let’s Encrypt. We will create an SSL certificate for our example.com domain and adapt the Nginx configuration as well as the ufw configuration.
This article was first published at Hetzner Community: https://community.hetzner.com/tutorials/add-ssl-certificate-with-lets-encrypt-to-nginx-on-ubuntu-20-04
Prerequisites
- Setup Ubuntu 20.04
- Install Nginx on Ubuntu 20.04
- A top-level domain, e.g. example.com
Step 1 - Install Certbot
First, update your server:
holu@10.0.0.1:~$ sudo apt-get update && sudo apt-get upgrade -y
Then we are going to install Certbot:
holu@10.0.0.1:~$ sudo apt install certbot python3-certbot-nginx
Step 2 - Allow HTTPS traffic
In the earlier tutorials we only allowed HTTP traffic through our firewall. So your ufw status should look like this:
holu@10.0.0.1:~$ sudo ufw status
Status: active
To                         Action      From

OpenSSH                    ALLOW       Anywhere
Nginx HTTP                 ALLOW       Anywhere
OpenSSH (v6)               ALLOW       Anywhere (v6)
Nginx HTTP (v6)            ALLOW       Anywhere (v6)
Now we need to change this to also allow HTTPS traffic:
holu@10.0.0.1:~$ sudo ufw allow 'Nginx Full'
holu@10.0.0.1:~$ sudo ufw delete allow 'Nginx HTTP'
Our new ufw status looks like this:
holu@10.0.0.1:~$ sudo ufw status
Status: active
To                         Action      From

OpenSSH                    ALLOW       Anywhere
Nginx Full                 ALLOW       Anywhere
OpenSSH (v6)               ALLOW       Anywhere (v6)
Nginx Full (v6)            ALLOW       Anywhere (v6)
Step 3 - Get an SSL Certificate
In this step we will ask certbot to give us an SSL certificate. Certbot will also automatically adapt our Nginx configuration we previously set.
For this we need to run the following command:
holu@10.0.0.1:~$ sudo certbot --nginx -d example.com
If you will use both example.com and www.example.com you need to tell it certbot in this step:
holu@10.0.0.1:~$ sudo certbot --nginx -d example.com -d www.example.com
Step 3.1 - Certbot Prompt
Certbot will prompt you with the following:
Saving debug log to /var/log/letsencrypt/letsencrypt.log
Plugins selected: Authenticator nginx, Installer nginx
Enter email address (used for urgent renewal and security notices) (Enter 'c' to
cancel):
Specify an email that you check regularly, as Let’s Encrypt will warn you by email about expiring certificates.
Please read the Terms of Service at
https://letsencrypt.org/documents/LE-SA-v1.2-November-15-2017.pdf. You must
agree in order to register with the ACME server at
https://acme-v02.api.letsencrypt.org/directory
- - - - - - - - - - - - - - - - - - - - - - - - - - - - - - - - - - - - - - - -
(A)gree/(C)ancel: A

Would you be willing to share your email address with the Electronic Frontier
Foundation, a founding partner of the Let's Encrypt project and the non-profit
organization that develops Certbot? We'd like to send you email about our work
encrypting the web, EFF news, campaigns, and ways to support digital freedom.

(Y)es/(N)o:
Here you need to accept the terms of service and choose whether you want to subscribe to the newsletter of EFF.
Obtaining a new certificate
Performing the following challenges:
http-01 challenge for example.com
Waiting for verification...
Cleaning up challenges
Deploying Certificate to VirtualHost /etc/nginx/sites-enabled/example.com
Please choose whether or not to redirect HTTP traffic to HTTPS, removing HTTP access.

1: No redirect - Make no further changes to the webserver configuration.
2: Redirect - Make all requests redirect to secure HTTPS access. Choose this for
new sites, or if you're confident your site works on HTTPS. You can undo this
change by editing your web server's configuration.

Select the appropriate number [1-2] then [enter] (press 'c' to cancel):
For new sites you should choose 2, but choose according to your needs.
Redirecting all traffic on port 80 to ssl in /etc/nginx/sites-enabled/example.com
Congratulations! You have successfully enabled https://example.com
You should test your configuration at:
https://www.ssllabs.com/ssltest/analyze.html?d=example.com
IMPORTANT NOTES:
-
Congratulations! Your certificate and chain have been saved at:
/etc/letsencrypt/live/example.com/fullchain.pem
Your key file has been saved at:
/etc/letsencrypt/live/example.com/privkey.pem
Your cert will expire on 2021-11-20. To obtain a new or tweaked
version of this certificate in the future, simply run certbot again
with the "certonly" option. To non-interactively renew all of
your certificates, run "certbot renew"
-
Your account credentials have been saved in your Certbot
configuration directory at /etc/letsencrypt. You should make a
secure backup of this folder now. This configuration directory will
also contain certificates and private keys obtained by Certbot so
making regular backups of this folder is ideal.
-
If you like Certbot, please consider supporting our work by:
Donating to ISRG / Let's Encrypt: https://letsencrypt.org/donate
Donating to EFF: https://eff.org/donate-le
You just obtained an SSL certificate!
Your new Nginx config should look as follows:
server {
root /var/www/example.com/html;
index index.html;
server_name example.com;
location / {
try_files $uri $uri/ =404;
}
listen [::]:443 ssl ipv6only=on; # managed by Certbot
listen 443 ssl; # managed by Certbot
ssl_certificate /etc/letsencrypt/live/example.com/fullchain.pem; # managed by Certbot
ssl_certificate_key /etc/letsencrypt/live/example.com/privkey.pem; # managed by Certbot
include /etc/letsencrypt/options-ssl-nginx.conf; # managed by Certbot
ssl_dhparam /etc/letsencrypt/ssl-dhparams.pem; # managed by Certbot

}
server {
if ($host = example.com) {
return 301 https://$host$request_uri;
} # managed by Certbot
listen 80;
listen [::]:80;
server_name example.com;
return 404; # managed by Certbot
}
Conclusion
We have installed certbot which communicates with Let’s Encrypt and installed an SSL certificate. Certbot also configured Nginx correctly to use our new SSL certificate. We also adapted the ufw firewall to let both HTTP and HTTPS traffic through.
SETUP UBUNTU 20.04
Introduction
In this tutorial you will learn how to setup an Ubuntu server. This includes how to create a non-root user, enable SSH login, disable root login and enable a rudimentary firewall.
This article was first published at Hetzner Community: https://community.hetzner.com/tutorials/setup-ubuntu-20-04
Step 1 - Login to your new serverLogin as the root user to your new Ubuntu 20.04 server:
ssh root@10.0.0.1
If you already set up your server with an SSH key and it isn’t your default key you need to tell your machine where to find it:
ssh -i /path/to/ssh/key root@10.0.0.1
Step 2 - Create a new non-root user
It is recommended not to use a root user on a regular basis. Thus we will create a new non-root user.In the future we will only use this user to log in.Type this command to create a new user:
root@10.0.0.1:~$ adduser holu
Now you will be prompted to enter some information.First, enter a strong password. The remaining information you can fill out or skip by pressing ENTER.
Step 3 - Add new user to sudo group
Our new user has only regular account privileges. But as we are going to use it as our main user, we will sometimes need administrative privileges. To be able to run administrative commands as a non-root user we need to add our user to the sudo group.
For this still as the root user we will run this command:
root@10.0.0.1:~$ usermod -aG sudo holu
Step 4 - Switch to the new user
Now log out of the root user with the following command:
root@10.0.0.1:~$ exit
Afterwards we can log in with our new user:
ssh holu@10.0.0.1
Now that we are logged in as a non-root user we need to use sudo in front of administrative commands.
Step 5 - Enable a basic firewall
After creating a non-root user we want to enable the firewall. For this we will use ufw.
Step 5.1 - List all available applications
First, we want to list all available applications which we can register with the firewall.
You can list them with the following command:
holu@10.0.0.1:~$ sudo ufw app list
This will be the output:
Available applications: OpenSSH
Step 5.2 - Allow OpenSSH
As we want to use SSH for future logins we need to enable it before we activate the firewall:
holu@10.0.0.1:~$ sudo ufw allow OpenSSH
Step 5.3 - Enable the firewall
Now, that the firewall allows SSH connections we can activate it:
holu@10.0.0.1:~$ sudo ufw enable
Next, check the status:
holu@10.0.0.1:~$ ufw status
Status: active
To                         Action      From

OpenSSH                    ALLOW       Anywhere
OpenSSH (v6)               ALLOW       Anywhere (v6)
The firewall now blocks all connections except SSH.
If we install new applications we need to activate them. Otherwise their connection will be blocked by the firewall.
Step 6 - Add SSH keys
Create an SSH key pair on your local machine.
Now, copy the public key from your local machine to your server with the following command:
cat ~/.ssh/ssh_key.pub | ssh holu@10.0.0.1 "mkdir -p ~/.ssh && chmod 700 ~/.ssh && cat >> ~/.ssh/authorized_keys && chmod 600 ~/.ssh/authorized_keys"
- Replace ~/.ssh/ssh_key.pub with the path to your public SSH key.
- Replace holu with your new username
- Replace 10.0.0.1 with the IP of your server.
Step 7 - Edit the sshd config
Now, that we use SSH for our login we need to deactivate password based login and the login for the root user.
For this we will edit the file /etc/ssh/sshd_config:
holu@10.0.0.1:~$ sudo nano /etc/ssh/sshd_config
Step 7.1 - Deactivate password based login
Within the file locate the following line:
PasswordAuthentication yes
And change it to:
PasswordAuthentication no
Step 7.2 - Disable root login
Within the file locate the following line:
PermitRootLogin yes
And change it to:
PermitRootLogin no
Step 7.3 - Restart sshd service
Save and close the editor.
Now restart the sshd service:
holu@10.0.0.1:~$ sudo systemctl restart ssh
Step 8 - Create an SSH config (Optional)
For Mac/Linux:
Create an SSH config on your local machine. Here we will tell our machine where to find our SSH key, so we don’t have to specify it each time we login.
Run the following command on your local machine:
sudo nano ~/.ssh/config
Add now the following content adapted to your SSH key:
HOST 10.0.0.1
IdentityFile ~/.ssh/SSH-key
Now whenever you login to your server your machine looks up the correct SSH key.
Conclusion
We have now a basic Ubuntu 20.04 server. We have created a non-root user, and enabled SSH login. Futhermore we disabled root login and activated the ufw firewall.

HOW TO BACKUP AND RESTORE GHOST
In this article I will describe how to create a backup of the Ghost database and directory, back it up and restore it.
Prerequisites:
- Ghost running on a VPS
- Google Drive, or similar
Creating the Backup
Step 1 - Backup the database
In this step we will create a copy of the database and the directory.
Step 1.1 - Create a mysql backup user
Within your server login to mysql:
mysql -u root -p
Now within mysql we are going to create a user dedicated to backups only. For this run the following command and replace the
mysql> CREATE USER 'backup'@'localhost' IDENTIFIED BY '<password>';
Now the user also needs the correct privileges to create a backup:
mysql> GRANT ALL ON your_ghost_database.* TO 'backup'@'localhost';
mysql> FLUSH PRIVILEGES;
If you’re not sure how your database is named you can also look it up in the config.production.json. You can find it in the root directory of your ghost installation.
You can now exit mysql:
mysql> quit
Step 1.2 - Create a mysql config file
We are going to create a mysql config file to not have to retype the password every time we execute a mysql command.
Create the file with your editor (nano/vim):
vim ~/.my.cnf
And add the following content to it:
[client]
user=backup
password='<password>'
Save and close the file and adapt the privileges of it:
chmod 600 ~/.my.cnf
Step 1.3 - Create a backup
You should now be able to execute the following command:
mysqldump your_ghost_database > your_ghost_database.sql
Within your current directory you should now have the your_ghost_database.sql file.
Step 2 - Backup your content
The following command will create a compressed archive of your content:
tar -zvcf ./content.tar.gz /var/www/ghost/content
- cf: Archive something
- v: verbosely list files processed
- z: filter the archive through gzip
Step 3 - Save Backup in Google Drive
For this we are using rclone.
sudo apt-get intall rclone
Configure rclone with the following command. Andy Ibanez has a good tutorial on how to use rclone.
rclone config
Step 4 - Put it together
Now we are going to create a script ~/Backups/backup.sh which will execute all those steps for us.
#!/bin/bash

current_date=$(date +'%Y-%m-%d_%H-%M')
echo "Starting backup of ghost instances!"
echo "Creating backup folder for $current_date"
mkdir "/home/jp/Backups/ghost/$current_date"
echo "Dumping database"
mysqldump your_ghost_database | gzip > "/home/jp/Backups/ghost/$current_date/your_ghost_database.sql.gz"
echo "Compressing content folder"
tar -zvcf "/home/jp/Backups/ghost/$current_date/content.tar.gz" –absolute-names /var/www/ghost/content > /dev/null
echo "Saving to Google Drive"
/usr/bin/rclone copy –update –verbose –transfers 30 –checkers 8 –contimeout 60s –timeout 300s –retries 3 –low-level-retries 10 –stats 1s "/home/jp/Backups/ghost/$current_date/" "google-drive:Server_Backups/ghost/$current_date/"
echo "Finished Backup!"
Step 5 - Cronjob
Add a cronjob:
crontab -e
Add the following line:
0 0 * * * /home/jp/Backups/backup.sh
Restoring the backup
Step 1 - Download data
rclone copy google-drive:/Server_Backups/ ~/
Step 2 - Extract the files
gzip -d ./Server_Backups/ghost/$date/your_ghost_database.sql.gz
gzip -d  ./Server_Backups/ghost/$date/content.tar.gz
tar -xf ./Server_Backups/ghost/$date/content.tar
Step 3 - Replace the database
First, login to mysql and run the following commands:
mysql> DROP DATABASE your_ghost_database;
mysq> CREATE DATABASE your_ghost_database;
mysql> quit
Now import your uncompressed database:
mysql your_ghost_database < your_ghost_database.sql
Step 4 - Replace the content
sudo rm -r /var/www/ghost/content
mv ~/Server_Backups/ghost/date/content /var/www/ghost/
Conclusion
We just backed up our ghost instance and restored it from a backup. If something went wrong try running ghost doctor and checking the permissions.
Sources:* https://dev.to/kvizdos/how-to-automatically-backup-ghost-blogs-4he1

UNBOXING & SETUP OF THE LEDGER NANO X

If you don’t have one yet, you can get it here: Ledger Nano X*
What is the Ledger Nano X?
As I explained in the article about wallets the Nano X is a cold wallet on which you can securely store your cryptocurrencies.
The Nano X is more convenient to use than the Nano S on the go as it has bluetooth capabilities. It has also a bigger capacity than the Nano S. The Nano X can handle up to 100 apps at the same time whereat the Ledger Nano S can only take up to 3 apps at the same time. And the display is twice as wide as the one on the Nano S.
You can get the Ledger Nano X* for 119€ and the Ledger Nano S* for 59€.
Content of the Package
- Ledger Nano X*
- USB-A to USB-C Cable
- 3x Recovery sheets for the recovery phrase
- Stickers
- Keychain
- Getting Started Guide
- Use Care and Regulatory Statement
Enjoy this Article?
Here are a few more things you might find interesting:
What are wallets and why do I need a wallet?
*This post contains affiliate links. If you use these links to buy something I may earn a commission. Thanks.

WHAT ARE WALLETS AND WHY DO I NEED A WALLET?
What are wallets and why do I need a wallet?
Wallets allow you to keep track of your cryptocurrency holdings. The most important features of those wallets are the public and the private key.
The public key is an identifier for your wallet. It works similar as an username on a social network. With the pubic key someone can send you money.
The private key on the other hand is like your pin for your bank account. With it you can check your balance or initiate transactions.
What is the difference between a hot and a cold wallet?
The main difference between those two types of wallets is that the hot wallet is constantly connected to the internet and the cold wallet isn’t. For a hot wallet you usually don’t need any additional hardware. This makes the hot wallet more accessible and convenient. But on the other side they are more prone to hacking. Therefore you shouldn’t store significant amounts of cryptocurrency in a hot wallet.
Hot Wallet
For hot wallets we need to differentiate between exchange connected wallets and software wallets.
Exchange connected wallets
Exchange connected wallets are provided by exchanges like Coinbase or Bitstamp. Those exchanges will handle the underlying infrastructure and the public and private key of the wallets. If the exchange may suffer a hacking attack your wallet may be at risk.
Software wallets
Software wallets are applications you can download and they aren’t linked to an exchange. Therefore you are in full control of the wallet and the keys. But it is still very prone to hacking, as your computer is most of the time connected to the internet.
Cold Wallet
The types of cold wallets range from USB, CD, hard drive, paper, offline computer to specially designed hardware wallets.
Paper wallet
Here the public and private keys are just printed on a paper. Additionally a QR code will be printed on the paper which can be easily scanned to make transactions. If the paper gets lost, stolen or destroyed you will lose access to your funds.
Hardware wallet
Hardware wallets are specially design tools to help you store your keys securely. The most popular options are Ledger and Trezor.
Ledger
- Ledger Nano S* - 59€
- Ledger Nano X* - 119€
Trezor
- Trezor Model One - 58,31€
- Trezor Model T- 189,21€
My Wallet
I wanted a cold wallet as they are more secure. And therefore I chose and bought the Ledger Nano X. After some time using the Ledger Nano X I will publish a review about it.
*This post contains affiliate links. If you use these links to buy something I may earn a commission. Thanks.

AWS SCRIPTS
In this article I list all code snippets I find/create regarding AWS. Most of those snippets work with the AWS SDK for python ‘boto3’.
Prerequisites
Please follow this article to setup your AWS development environment.
Index
Print all S3 buckets
import boto3
s3 = boto3.resource('s3')
for bucket

CONFIGURE YOUR AWS DEVELOPMENT ENVIRONMENT
This article covers the basic steps which you need to be able to develop with AWS on your local machine.
- Install the AWS CLI
- Create an AWS IAM user
- Configure your development environment
- Install the AWS CDK
- Install the AWS SDK for Python
Configure your development environment
Now run the following command to configure your development environment and insert your corresponding values:
aws configure
Install the AWS SDK for Python
pip3 install boto3

BASIC RASPBERRY PI CONFIGURATION FOR HEADLESS MODE
Enable SSH
Add an file to the boot partition called “ssh”. This enables you to connect to the pi via ssh.
Enable WiFi
To enable wifi on the raspberry pi add a file named “wpa_supplicant.conf” to the boot partition. Add following content to this file and adapt it to your needs.
ctrl_interface=DIR=/var/run/wpa_supplicant GROUP=netdev
country=<Insert 2 letter ISO 3166-1 country code here>
update_config=1
network={
ssid="<Name of your wireless LAN>"
psk="<Password for your wireless LAN>"
}
- 1
- 2